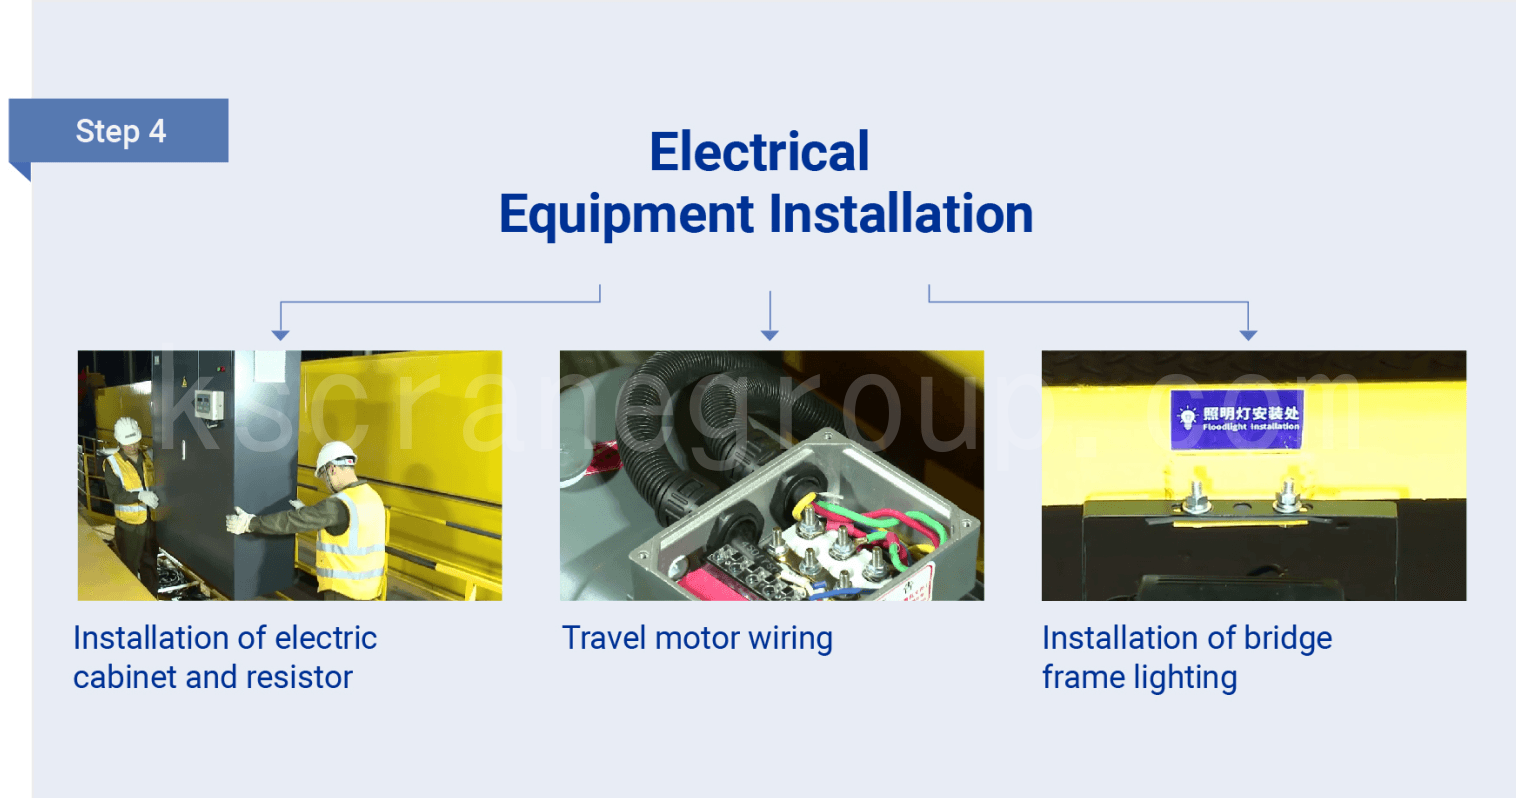
- АБСТАЛЯВАННЕ
-
спецыяльныя краны
-

Журавель для смецця
-

Ліцейны пад'ёмны кран
-

Выбухаабаронены моставы кран
-

Шчыпцы падвесны кран
-

Маставы кран з апорнай бэлькай
-

Электрамагнітныя моставыя краны
-

Дызельна-гідраўлічны портавы перавозчык: гнуткая эксплуатацыя і даступнае рашэнне для апрацоўкі кантэйнераў
-

Партальны кран верхняга вадазліўнага засаўкі: надзейнае рашэнне для пад'ёму засаўкі плаціны і эксплуатацыі гідраэлектрастанцый
-

Партальны кран для порта: магутныя і інтэлектуальныя рашэнні для эфектыўнай апрацоўкі партовых грузаў
-

Кран для коксавых печаў CDQ: выключная магутнасць пры перапрацоўцы распаленага коксу
-

Спецыялізаваны кран для выратавання на вадзе: распрацаваны для навучання выратаванню жыццядзейнасці
-

Інтэлектуальны маставы кран з каўшом-грэйферам: магутнае, дакладнае і беспілотнае рашэнне для перамяшчэння сыпкіх матэрыялаў
-

Шматкропкавы падвесны маставы кран на заказ для прамысловых будынкаў з вялікім пралётам і адчувальных да нагрузкі
-

Электралітычныя медныя краны: спецыялізуюцца на эфектыўнай загрузцы і перагрузцы рэзервуараў з катоднымі пласцінамі
-

Атамныя палярныя краны: шматфункцыянальнае пад'ёмнае абсталяванне для атамных электрастанцый
-
-
Прамысловы кран
-

Прамысловы кран
-

Кандунскія жураўлі
-
Краны пліты
-

Лом жураўлёў
-

Краны нарыхтоўкі
-

Краны для апрацоўкі шпулек, планак і пліт
-

Цэмент і зборны кран
-

Кран электрастанцыі
-

Коўш жураўлёў
-

Краны для папяровай прамысловасці
-

Краны для перапрацоўкі адходаў у энергію і краны для біямасы
-

Маставыя краны, вырабленыя на заказ для аэракасмічнай прамысловасці: высокая дакладнасць, эфектыўнасць, бяспека і надзейнасць
-

Шматфункцыянальныя краны для абпалу анодаў: універсальныя, устойлівыя да высокіх тэмператур і з разумным кіраваннем, неабходныя для электралітычнай алюмініевай прамысловасці
-

Шматфункцыянальны кран для электралітычнага алюмінію: выконвае ўсе працэсы электролізу алюмінію, павышае эфектыўнасць завода
-

Штабелерны кран для складскіх памяшканняў AS/RS: высокаэфектыўнае, надзейнае, цалкам аўтаматызаванае захоўванне
-

Маставы кран для перамяшчэння слябоў: металургічны кран для бесперапыннага ліцця і слябовых двароў
-

Краны для штабелявання анодных вугляродных блокаў: 6-слаёвае штабеляванне, пад'ёмнае рашэнне для эфектыўнай перадачы вугляродных заводаў
-

Кран для загартоўкі для тэрмічнай апрацоўкі: тэхналагічнае рашэнне з маставым кранам
-

Бяспечны і стабільны маставы кран для загрузкі лому ў металургічных аперацыях
-

Маставы кран для кавальскіх работ: надзейнае пад'ёмнае абсталяванне для цяжкіх кавальскіх майстэрняў
-

Кран для апрацоўкі прэс-формаў для вытворчай лініі газабетону: надзейнае інжынернае рашэнне для пад'ёму ў фіксаваным становішчы
-

Маставыя краны для травлення: для асяроддзяў з кіслотным туманам пры выплаўцы каляровых металаў
-
-
Каляска з пад'ёмнікам і лябёдкай
-

Ліццё электрычнага пад'ёмніка
-

Еўрапейская мадэль электрычнага пад'ёмніка
-

Выбуханебяспечны электрычны пад'ёмнік
-

Электрычны пад'ёмнік з нізкім запасам
-

Электрычны ланцуговы пад'ёмнік
-

2 тыпу выбухаабароненых электрычных ланцуговых пад'ёмнікаў для небяспечных зон: абарона ад газу і пылу
-

2 тыпу выбухаабароненых электрычных канатных пад'ёмнікаў для прамысловай бяспекі: надзейныя рашэнні для абароны ад газу і пылу
-

Ручныя пад'ёмнікі для дакладнага пад'ёму: азнаёмцеся з 3 праверанымі тыпамі для працы без электраэнергіі
-

Пнеўматычныя пад'ёмнікі: 4 спецыялізаваныя канструкцыі для дакладнасці, бяспекі і працы ў жорсткіх умовах
-

Электрычная пад'ёмная таль тыпу HC: цяжкі тросавы пад'ёмнік для пад'ёму цяжкіх грузаў на заводзе
-
-
КРАН Раскідвальнік
-
Электрамагнітныя пад'ёмныя магніты крана
-

Пад'ёмны электрамагніт для павароту і бакавога падвешвання
-

Пад'ёмны электрамагніт для тоўстай пласціны
-

Спецыялізаваны электрамагніт для ўздыму сталёвых пласцін
-

Пад'ёмныя электрамагніты для ўздыму сталёвых пласцін
-

Пад'ёмны электрамагніт для цяжкіх рэек і профільнай сталі
-

Пад'ёмны электрамагніт для высакахуткаснага Wier (спіралі)
-

Пад'ёмны электрамагніт для арматуры і сталёвых труб
-

Пад'ёмны электрамагніт для зборнай арматуры і профільнай сталі
-

Пад'ёмны электрамагніт для нарыхтовак, балочных нарыхтовак і пліт
-

Пад'ёмны электрамагніт для сталёвага лому
-
- Кран-спрэдэр
- Крук жураўля
- Кранавыя пад'ёмныя шчыпцы і заціскі
-
Электрамагнітныя пад'ёмныя магніты крана
- ЧАСТКІ КРАНА
-
Перадача кошыка
-

Перадача кошыка
-

Перакладная каляска для чыгуначнай пласціны
-

Сталёвы кошык для перадачы шпулькі
-

Кошык для перадачы коўшыкаў
-

Кошык для перадачы батарэі KPX
-

Кабельная катушка KPJ
-

KPT Мабільная кабельная каляска
-

Нізкавольтная каляска КПДЗ
-

Паваротная мадэль каляскі для перадачы чыгункі
-

Транспарцёрныя каляскі AGV: эфектыўны выбар для аўтаматызаванай інтэлектуальнай апрацоўкі матэрыялаў
-


.png?w=200&h=134)