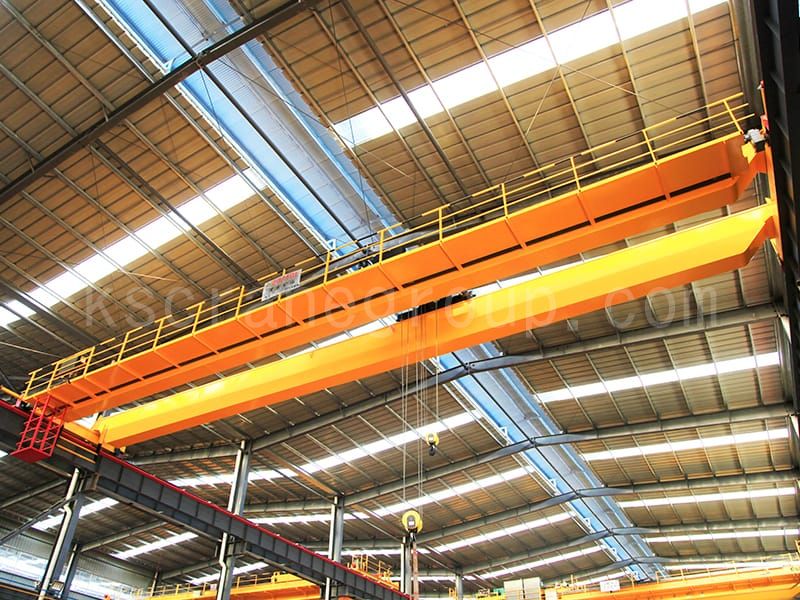
Overhead Crane Structural Failures: Girder Cracks, Deformation & Inspection Guide

Date: 02 Jun, 2026

A failed brake can be replaced. A damaged gearbox can be rebuilt. But when the steel structure itself begins to crack, deform, or permanently sag, the consequences are far more serious.

Overhead crane structural failures are among the most dangerous and costly problems in industrial lifting systems. Structural damage can reduce load-bearing capacity, create alignment problems, accelerate fatigue, and in severe cases, lead to catastrophic crane failure.

The most common forms of overhead crane structural failures include girder fatigue cracks, splice weld cracking, web buckling, horizontal sweep deformation, and permanent downward deflection. These issues are often caused by overload operation, poor welding quality, fatigue accumulation, thermal exposure, or improper transportation and storage.

This guide explains how to identify the most common overhead crane structural failures, understand their root causes, apply appropriate repair methods, and establish a reliable inspection program to extend crane service life.

Part 1: Five Structural Failure Modes

1Overhead Crane Structural Failures

1. Main Girder Web or Cover Plate Fatigue Cracks

What you'll see: Hairline cracks on the web plate or bottom/top cover plate of the box girder. Often originates at weld toes, stiffener terminations, or areas with geometric stress concentration.

CauseEngineering Detail
Long-term overload operationStress range exceeds fatigue limit of the welded detail
Design fatigue life exceededCMAA / FEM service class mismatch with actual duty cycle

Corrective Action:

Crack SeverityProcedure
≤ 0.1 mm (superficial)Grind smooth with abrasive wheel; verify complete removal with dye penetrant (PT)
> 0.1 mmDrill ≥ Φ8 mm stop holes at both crack tips; gouge to 60° included-angle groove along the crack path; weld-fill with qualified procedure (low-hydrogen electrode); grind flush
On critical load-bearing sectionAfter weld repair, add a reinforcement plate (full-penetration or fillet-welded per engineering assessment) to restore original strength

After any weld repair on a primary member: Perform NDT (UT or MT) and proof-load test at 125% rated capacity before returning to service.

2. Splice Weld or Truss Node Weld Cracking

2Splice Weld or Truss Node Weld Cracking

What you'll see: Cracked or separated welds at girder splice joints, diaphragm-to-web connections, or truss node gusset plates.

CauseCorrective Action
Original weld defects (porosity, slag inclusion, lack of fusion)Gouge out defective weld; re-weld with qualified low-hydrogen electrode
Long-term overloadStop overload operation immediately — no repair will hold if overloading continues
Excessive welding residual stress from poor original procedureRe-weld using proper sequence (back-step, skip welding) to control distortion and residual stress

Key principle: You cannot weld-repair a crack that is still growing due to overload. Fix the root cause (loading, misalignment, rail condition) first, then repair the steel.

3. Main Girder Web Buckling (Wave Deformation)

What you'll see: Visible waves or ripples in the girder web plate, typically in the compression zone near the top flange or in high-shear panel zones near the supports.

CauseCorrective Action
Welding-induced residual compressive stress from fabricationFlame straightening (line heating): Apply controlled heat lines in the tension field to shrink and pull the web flat. Follow with mechanical peening to relieve residual stress
Overload causing local web panel instability (shear buckling)Stop overload immediately. After flame correction, consider adding intermediate stiffeners to reduce the web panel aspect ratio and increase buckling resistance

Flame straightening parameters (guideline):

  • Temperature: 600–650°C (dull red visible in low light)
  • Heating pattern: Triangular or linear, perpendicular to the wave crests
  • Cooling: Still air (never water-quench — risk of martensite formation and cracking)

4. Main Girder Sideways Bending (Horizontal Sweep / Bow)

What you'll see: The girder curves to one side when viewed from above. Measured as horizontal deviation from a straight line between girder ends.

CauseCorrective Action
Asymmetric welding during original fabrication — residual stress combined with service stressFlame straightening: Apply heat on the convex (outward-bulging) side of the girder. Use mechanical jacks or come-alongs to assist the correction
Improper transport or storage (supported at wrong points, stacked unevenly)Correct the bending, then review and enforce proper handling procedures

Acceptance criteria: Per CMAA 70, horizontal camber deviation should not exceed L/2000 (where L = span in mm) for new cranes. For in-service cranes, consult the manufacturer — but any visible sweep that causes rail alignment issues requires correction.

5. Main Girder Downward Deflection (Sinking / Permanent Set)

What you'll see: The girder's upward camber is gone, replaced by a flat or downward-sagging profile. The loaded trolley no longer “drifts to center” — it drifts toward the ends or stays put.

CauseCorrective Action
Structural yielding from chronic overloadFlame straightening along the bottom cover plate, plus reinforcement with channel sections stitch-welded to the bottom flange
Web buckling reducing girder section effectivenessUse prestressing method: Install tension rods below the girder, post-tension to restore upward camber, then lock off. For permanent reinforcement, weld continuous stiffening channels
Thermal effects (radiant heat from ladle cranes, foundry applications)Add heat shielding; for ladle cranes, verify the original design accounted for the thermal service class
Improper storage or transportCorrect camber then store/ship per crane manufacturer's lifting and support diagram

Critical warning: A girder that has permanently sagged has already yielded — the steel has been stressed beyond its elastic limit. Flame straightening alone may not restore the full fatigue life. A post-repair engineering assessment (including FEA reevaluation of the repaired section) is strongly recommended.

Part 2: NDT Inspection Methods for Steel Structures

Not every crack is visible to the naked eye. Use these non-destructive testing methods on a scheduled basis:

MethodBest ForFrequencyNotes
Visual Testing (VT)Surface cracks, corrosion, deformation, loose boltsEvery shiftThe most important and most underrated
Magnetic Particle (MT)Surface and near-surface cracks in ferromagnetic steelAnnually, or after any overload eventFast, portable, no surface prep beyond cleaning
Dye Penetrant (PT)Surface-breaking cracks — works on all materialsAnnually, or to verify weld repairsSimple but needs clean surface and dwell time
Ultrasonic Testing (UT)Internal flaws in thick sections, crack depth measurementEvery 3–5 years, or per OEMRequires trained operator and calibration blocks
Laser / Total Station SurveyGirder camber, sweep, and overall geometryAnnuallyCompare to baseline measurements from commissioning

Part 3: Pre-Shift Structural Inspection Checklist

A 5-minute visual walk-around can catch structural problems before they become critical:

  • Main girder(s): Look for fresh paint cracking or rust stains — often the first visible sign of a growing fatigue crack
  • End carriages/end trucks: Check bolted connections. Any loose or missing bolts?
  • Splice joints: Run a flashlight along girder splice welds. Look for cracked paint, rust bleeding from welds
  • Diaphragm/stiffener terminations: These are classic fatigue crack initiation points — look closely
  • Rail clips and rail splices: Loose or broken clips cause impact loads that accelerate structural fatigue
  • Trolley rail on girder: Check for rail misalignment or gaps — causes eccentric loading on the girder web
  • Corrosion: Especially at the junction of the bottom flange and web in outdoor or wet-environment cranes
  • Suspension points / equalizer pins: On overhead traveling cranes, worn pins create impact loads that feed back into the structure
  • Runway beams and support columns: The crane is only as strong as what it's mounted on
  • Any deformation or impact damage: Dents from collision damage create stress risers

Quick Reference: Structural Repair Decision Matrix

FindingAction
Superficial paint crack, no rust, PT shows no base metal crackMonitor at next scheduled inspection
Confirmed fatigue crack < 50 mm on secondary member (diaphragm, stiffener)Drill-stop, gouge, weld-repair per qualified WPS
Confirmed crack > 50 mm or on primary member (girder flange/web, end carriage)Engineering assessment required; reinforcement plate may be needed; post-repair proof load test mandatory
Visible web buckling (waves > 3 mm out-of-plane over 500 mm span)Flame-straighten; investigate root cause (overload? design?)
Measurable permanent downward deflection (> L/1000 from as-built camber)Major repair required; prestressing or reinforcement; structural re-rating may be necessary
Multiple cracks in same girder region, or crack extending into parent metal beyond weldReplace the girder section — scattered fatigue damage indicates the member has reached end of life

How to Prevent Overhead Crane Structural Failures

Preventing overhead crane structural failures is significantly more cost-effective than major structural repair or girder replacement. Most structural problems develop gradually and can be controlled through proper operation, inspection, and preventive maintenance.

Avoid Overloading

Repeated overload cycles are one of the leading causes of crane girder fatigue cracks and permanent deformation. Always ensure the actual lifted load remains within the crane's rated capacity and duty classification.

Conduct Scheduled Structural Inspections

Routine overhead crane inspection programs should include visual checks, weld inspection, rail alignment verification, and periodic non-destructive testing (NDT). Fatigue cracks are often discovered long before they become visible failures.

Maintain Proper Rail Alignment

Poor runway alignment creates eccentric wheel loading, which increases stress concentration in the girder web and end carriage connections.

Monitor Thermal Effects

For foundry and ladle cranes, radiant heat exposure can accelerate material degradation and cause structural distortion. Heat shields and thermal-resistant designs should be evaluated regularly.

Repair Minor Defects Early

Small paint cracks, rust bleed, and localized weld defects can become serious overhead crane structural failures if ignored. Early intervention significantly reduces long-term repair costs.

Need Expert Support?

Kuangshan Crane designs and manufactures steel structures for overhead cranes, gantry cranes, and jib cranes — from box girders to full crane kits. If you're dealing with structural deterioration on an aging crane, our engineering team can assess the damage, recommend repairs, or fabricate a replacement girder to original or upgraded specifications.

This guide is for informational purposes. Structural repair of crane girders must be performed under the supervision of a qualified engineer, in accordance with CMAA 70/74, EN 13001, ASME B30.2, and applicable local codes. Never weld on a crane structure without an approved welding procedure specification (WPS) and qualified welders.

Krystal
krystal
Crane OEM expert

With 8 years of experience in customizing lifting equipment, helped 10,000+ customers with their pre-sales questions and concerns, if you have any related needs, please feel free to contact me!

TAGS: Overhead Crane Structural Failures
English
Español Português do Brasil Русский Français Deutsch 日本語 한국어 العربية Italiano Nederlands Svenska Polski ไทย Türkçe हिन्दी Bahasa Indonesia Bahasa Melayu Tiếng Việt 简体中文 বাংলা فارسی Pilipino اردو Українська Čeština Беларуская мова Kiswahili Dansk Norsk Ελληνικά English